Crypto on the Web
Billions of people use cryptography on a daily basis without realising it. The 2010s saw the widespread adoption of encryption on the web, accelerated by the Snowden disclosures: in 2015, 30% of pages loaded on Android were protected by Transport Layer Security (TLS), but by 2020, it was 90%. Alongside TLS, major websites employ hash functions for password storage, signed tokens for authorisation, and complex protocols for handling payment-card data.
However, as we've seen from other categories, cryptography is full of subtleties, and teams building web apps often get it wrong. This highly practical category explores common ways that cryptography is used in web apps, together with devastating implementation errors that are seen in the real world.

JSON Web Tokens
Toggle-
Token Appreciation5 pts · 6520 SolvesJavaScript Object Signing and Encryption (JOSE) is a framework specifying ways to securely transmit information on the Internet. It's most well-known for JSON Web Tokens (JWTs), which are used to authorise yourself on a website or application. JWTs typically do this by storing your "login session" in your browser after you have authenticated yourself by entering your username and password. In other words, the website gives you a JWT that contains your user ID, and can be presented to the site to prove who you are without logging in again. JWTs look like this:
eyJ0eXAiOiJKV1QiLCJhbGciOiJIUzI1NiJ9.eyJmbGFnIjoiY3J5cHRve2p3dF9jb250ZW50c19jYW5fYmVfZWFzaWx5X3ZpZXdlZH0iLCJ1c2VyIjoiQ3J5cHRvIE1jSGFjayIsImV4cCI6MjAwNTAzMzQ5M30.shKSmZfgGVvd2OSB2CGezzJ3N6WAULo3w9zCl_T47KQ
You can recognise it because it's base64-encoded data split into three parts (separated by a.): the header, the payload, and the signature. In fact, it's a variant of base64 encoding, where the+and/have been replaced by different special characters since they can cause issues in URLs.
Some developers believe that the JWT encoding is like encryption, so they put sensitive data inside the tokens. To prove them wrong, decode the JWT above to find the flag. There are online tools to do this quickly, but working with Python's PyJWT library will prepare you best for future challenges.You must be logged in to submit your flag.
JWT Sessions10 pts · 5484 SolvesThe traditional way to store sessions is with session ID cookies. After you login to a website, a session object is created for you on the backend (the server), and your browser (the client) is given a cookie which identifies that object. As you make requests to the site, your browser automatically sends the session ID cookie to the backend server, which uses that ID to find your session in its own memory and thus authorise you to perform actions.
JWTs work differently. After you login, the server sends your web browser the whole session object in a JWT, containing a payload of key-value pairs describing your username, privileges, and other info. Also included is a signature created using the server's secret key, designed to prevent you from tampering with the payload. Your web browser saves the token into local storage.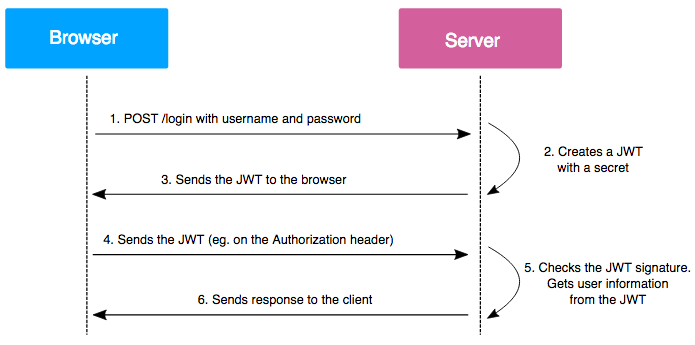
On subsequent requests, your browser sends the token to the backend server. The server verifies the signature first, and then reads the token payload to authorise you.
To summarise, with session ID cookies, sessions live on the server, but with JWTs, sessions live on the client.
The main advantage of JWTs over session ID cookies is that they are easy to scale. Organisations need a way to share sessions across multiple backend servers. When a client switches from using one server or resource to another, that client's session should still work. Furthermore, for large orgs there could be millions of sessions. Since JWTs live on the client, they solve these problems: any backend server can authorise a user just by checking the signature on the token and reading the data inside.
Unfortunately there are some downsides to JWTs, as they are often configured in an insecure way, and clients are free to modify them and see if the server will still verify them. We'll look at these exploits in the next challenges. For now, the flag is the name of the HTTP header used by the browser to send JWTs to the server.You must be logged in to submit your flag.
No Way JOSE20 pts · 4466 Solves · 8 SolutionsLet's look at JWT algorithms. The first part of a JWT is the JOSE header, and when you decode it, looks like this:
{"typ":"JWT","alg":"HS256"}
This tells the server it's a JWT and which algorithm to use to verify it. Can you see the issue here? The server has to process this untrusted input before it is actually able to verify the integrity of the token! In ideal cryptographic protocols, you verify messages you receive before performing any further operations on them, otherwise in Moxie Marlinspike's words, "it will somehow inevitably lead to doom".
The "none" algorithm in JWTs is a case in point. The link below takes you to a page where you can interact with a broken session API, which emulates a vulnerability that existed in a lot of JWT libraries. Use it to bypass authorisation and get the flag.
Play at https://web.cryptohack.org/no-way-joseYou must be logged in to submit your flag.
JWT Secrets25 pts · 4060 Solves · 6 SolutionsThe most common signing algorithms used in JWTs are HS256 and RS256. The first is a symmetric signing scheme using a HMAC with the SHA256 hash function. The second is an asymmetric signing scheme based on RSA.
A lot of guides on the internet recommend using HS256 as it's more straightforward. The secret key used to sign a token is the same as the key used to verify it.
However, if the signing secret key is compromised, an attacker can sign arbitrary tokens and forge sessions of other users, potentially causing total compromise of a webapp. HS256 makes the secret key harder to secure than an asymmetric keypair, as the key must be available on all servers that verify HS256 tokens (unless better infrastructure with a separate token verifying service is in place, which usually isn't the case). In contrast, with the asymmetric scheme of RS256, the signing key can be better protected while the verifying key is distributed freely.
Even worse, developers sometimes use a default or weak HS256 secret key.
Here is a snippet of source code with one function to create a session and another function to authorise a session and check for admin permissions. But there's a strange comment about the secret key. What are you going to do?
Play at https://web.cryptohack.org/jwt-secretsYou must be logged in to submit your flag.
RSA or HMAC?35 pts · 2619 Solves · 12 SolutionsThere's another issue caused by allowing attackers to specify their own algorithms but not carefully validating them. Attackers can mix and match the algorithms that are used to sign and verify data. When one of these is a symmetric algorithm and one is an asymmetric algorithm, this creates a beautiful vulnerability.
The server is running PyJWT with a small patch to enable an exploit that existed in PyJWT versions <= 1.5.0. To create the malicious signature, you will need to patch your PyJWT library too. If you want to patch, look at the line that was added in the fix for the vulnerability. Usepip show pyjwtto find the location of the PyJWT library on your computer, and make the edit. For versions of PyJWT > 2.4.0 the code has been changed so you will have to editjwt/utils.pyinstead ofjwt/algorithms.py
Play at https://web.cryptohack.org/rsa-or-hmacYou must be logged in to submit your flag.
JSON in JSON40 pts · 2721 Solves · 10 SolutionsWe've explored how flawed verification can break the security of JWTs, but it can sometimes be possible to exploit the code to sign unexpected data in the first place.
Play at https://web.cryptohack.org/json-in-json
Challenge contributed by sublevel_1157You must be logged in to submit your flag.
RSA or HMAC? Part 2100 pts · 1213 Solves · 9 SolutionsIt is possible to abuse JWT public keys without the public key being public? This challenge takes RSA or HMAC one step further, and now both a deeper knowledge of RSA maths and data formatting is involved. It's more realistic than the first part as web apps usually won't have a route disclosing their public key.
If you are attempting to implement the solution yourself (which is recommended over using a public script!), but the signature is not validating, take care that your formatting is 100% correct. We've added to the source the commands used to generate the private and public keys.
The server is running PyJWT with a small patch, the same as the previous challenge. Check the notes from the previous challenge.
Play at https://web.cryptohack.org/rsa-or-hmac-2You must be logged in to submit your flag.
TLS Part 1: The Protocol
Toggle-
Secure Protocols5 pts · 2448 SolvesThe rest of CryptoHack focusses on cryptographic primitives, low-level building blocks such as symmetric ciphers, public-key algorithms, and hash functions. This section however looks at cryptographic protocols. Cryptographic protocols are what happen when primitives are combined together, enabling two or more parties to communicate securely.
A good cryptographic protocol addresses the three core ideas of security (the CIA triad):- Confidentiality: keeping secrets
- Authenticity: verifying identities
- Integrity: ensuring safe transport
Transport Layer Security (TLS) is the most widespread cryptographic protocol; an average Internet user initiates hundreds of TLS connections every day. TLS aims to provide secure communication, meeting the above three requirements, over the insecure network infrastructure of the Internet. Most commonly TLS is used to secure HTTP traffic from a browser. To achieve this there are multiple major components, including TLS certificates, Certificate Authorities (CAs), a handshake phase, and more that we will cover.
Some still refer to TLS as SSL, which stands for Secure Sockets Layer, and was the older version of the protocol. The first version of TLS was defined in 1999.
Providing cryptographic security for Internet HTTP traffic is the core design goal of TLS. However, for TLS to be useful, security could not be the only goal. A wide range of devices communicate using TLS, from underpowered smartphones to powerful webservers, leading to three additional goals:- Interoperability: aims to ensure that two devices can communicate even if they are using different TLS implementations which support different sets of algorithms.
- Extensibility: means TLS can support many extra use-cases through optional extensions without overcomplicating the core protocol.
- Efficiency: important so that the performance cost of TLS is not too high, especially on low-end devices where cryptographic operations are slow.
The last main point to cover here is that there have been several versions of TLS, each of which has improved the protocol, and patched known vulnerabilities. Almost all devices in use today can be counted upon to support TLS 1.2 (released 2008), which is still considered reasonably secure, even though the current version TLS 1.3 (released 2018) offers major improvements. A small percentage of servers still support the now-ancient TLS 1.0 and even SSL 3.0 (which are vulnerable to several exploits) due to misconfigurations or the need to allow ancient hardware to connect to them. This shows how interoperability can work against security.
To get the flag for this challenge, browse totls1.cryptohack.organd find the name of the certificate authority organisation which issued the TLS certificate for the domain - this can be done purely within the browser. We'll explore the role of certificate authorities more in future challenges!
Resources:
- SSL Labs Statistics
You must be logged in to submit your flag.
Sharks on the Wire10 pts · 1965 SolvesThe best way to understand a network protocol is to watch real traffic. For this challenge you'll use the incredible Wireshark tool to investigate a TLS connection.
Wireshark is an open-source networking tool which can be used to easily record and analyse network traffic. It's widely used for troubleshooting so it's useful to know the basics of how to use it. Installation should be straightforward on Linux and macOS, on Windows it can be a little trickier, please check the docs.
Once you have Wireshark installed, open the file "cryptohack.org.pcapng" linked below. This is a packet capture showing the first 50 packets when we visited https://cryptohack.org in the Firefox browser. A packet is a formatted unit of data transmitted over a network. In the upper pane you can see a list of these packets and Wireshark is smart enough to figure out the network protocols used in each one based on the data inside. When you click on a packet, you get a "dissection" of each field in the data and what it means in the middle pane. In the bottom pane is a view of the raw packet bytes.
In the next challenges we'll look at what is happening in these packets. For now let's just get the hang of the Wireshark interface.
By default Wireshark only shows IP addresses in the source and destination columns. ClickView > Resolution > Resolve Network Addressesto see some helpful names we added to the source and destination IPs to make the communication clearer. While Wireshark can resolve some public IPs by itself (like178.62.74.206becomes "cryptohack.org" using the DNS request in the packet capture), Wireshark could not resolve the private IPs in the capture so we annotated those ourselves in the provided file by right-clicking the IPs thenEdit Resolve Name.
The search bar at the top of Wireshark allows the packets to be filtered using powerful expressions. You can also right-click packets on certain columns and clickApply as Filter > Selectedto apply the same criteria on the selected column to filter all packets in the capture. For instance, if you right-click and do this for a packet sent by the CryptoHack server in the "Source" column, theip.src == 178.62.74.206filter will be applied. To remove the filter clear the search bar and hit enter.
How many packets were received by the CryptoHack.org server (i.e. CryptoHack.org was the destination) in this capture?
Challenge files:
- cryptohack.org.pcapng
You must be logged in to submit your flag.
TLS Handshake15 pts · 1806 Solves · 2 SolutionsThis challenge uses the same packet capture as the previous challenge. Let's describe the communication we see at a high level.
The TLS communication only begins at packet 10, but what happens before provides important context:- Packets 1-2: First, when we typed cryptohack.org into the address bar and hit enter, a Domain Name System (DNS) request was made to translate the domain name (cryptohack.org) to an IP address (
178.62.74.206). - Packets 3-4: The "Safe Browsing" feature in Firefox reached out to a Google server to check that cryptohack.org was not a phishing or malicious domain.
- Packets 5-6: DNS responses to our DNS requests came back, saying that cryptohack.org can be reached at IP address
178.62.74.206. - Packets 7-9: A TCP three-way handshake (SYN, SYN-ACK, ACK) was initiated between our laptop and port 443 (the TLS port) of the server at
178.62.74.206. This negotiated a stable connection between the two computers over the Internet before the real data transfer could start. - Packet 10-11: A TLS ClientHello message was sent from our laptop to the server. The next challenge will expand on this, but for now note this was our laptop sending a bunch of important parameters such as the ciphers it supports. Packet 11 is an ACK TCP packet sent from the server ACKnowledging it received the packet from our laptop.
- Packet 12-17: The server sent TLS ServerHello, Change Cipher Spec, and Application Data messages. TLS 1.3 is designed to be really fast - the server sends back its own parameters, then signals Change Cipher Spec which means it is switching over to sending encrypted communications from now on. Then the server sends its TLS certificate encrypted.
- Packets 18-21: An Online Certificate Status Protocol (OCSP) connection was made from our laptop to an OCSP server, to check that the TLS certificate presented by CryptoHack hadn't been revoked... yet another thing we'll explore later!
- Packets 22-27: Our laptop sent a Change Cipher Spec message to note that it is switching over to sending encrypted data, and it finally made a HTTP request requesting the CryptoHack home page. The actual HTTP content of the connection can't be seen in the packet capture, as it's now encrypted!
- Packets 28-39: The server started sending the contents of the CryptoHack homepage to our client over HTTP wrapped in TLS.
- Packets 40-50: Firefox's HTML parser saw that it needed external resources from Content Delivery Networks such as
cdnjs.cloudflare.comto load JavaScript resources on the page and sent DNS requests to resolve those domains. This isn't relevant to TLS apart from the notable fact that DNS requests on most systems by default are not encrypted (but DNS-over-HTTPS, which fixes this obvious leak, is starting to get more common).
Wow, that was a lot of packets just to start displaying a relatively simple website, and that wasn't even all of them! By spending some time playing around in Wireshark you should gain a better grasp on what data TLS protects as well as what it does not.
To solve this challenge, find the Random data sent from cryptohack.org in theServerHellomessage of the packet capture. Randomness is contributed by both client and server, and it plays role in preventing replay attacks. A replay attack is when an attacker that has recorded an existing handshake tries to reuse the same messages to pretend to be a client or server in a new connection.
Challenge files:
- cryptohack.org.pcapng
Resources:
- The Illustrated TLS 1.3 connection
You must be logged in to submit your flag.
Saying Hello20 pts · 1698 Solves · 4 SolutionsAs we've seen, TLS connections begin with a handshake, where the client (normally a browser) and server agree on important parameters that will define the remainder of the connection. The parameters exchanged allow a shared secret to be generated, and after the handshake is complete, the shared secret is used to symmetrically encrypt subsequent application data.
At a high level TLS messages are called "records". The record format starts with a short header, which contains information about the TLS version, the content type of the message (handshake, change cipher spec, application data, and alert), and the data length. Then the data follows.
The first message sent is the ClientHello, where the client sends the server the following data:- A list of cipher suites it supports
- The highest TLS version it supports
- A list of extensions and compression methods it supports
- A random number (used to provide entropy in the key exchange, as seen in the previous challenge)
- A session ID to identify the connection
The TLS cipher suite that is negotiated is crucial as it specifies the cryptographic primitives that will be used. A cipher suite name is a human-readable representation of a cipher suite, and it looks like this:ECDHE-RSA-AES128-GCM-SHA256:ECDHEis the Elliptic-curve Diffie–Hellman algorithm used for key exchange.RSAis used to sign the certificate. This field is sometimes missing, in which case the signature algorithm to be used is negotiated in thesignature_algorithmsextension. In Wireshark, you can see the client's desired signature algorithms in the ClientHello message.AES-128is used to symmetrically encrypt the application data.GCMis the mode of operation that will be used for AES.SHA256will be used for handshake authentication.
You can check ciphersuite.info for more information about specific cipher suites.
Now for the challenge: the server "tls1.cryptohack.org" speaks both TLS 1.2 and TLS 1.3, and supports only a single TLS 1.2 cipher suite. What is this cipher suite? Give your answer in a similar format to the cipher suite name above (OpenSSL format).
To avoid a TLS 1.3 handshake, you can usecurloropensslcommands with specific flags to specify that TLS 1.2 is the maximum version you support in your ClientHello message, or you can use an online tool like Qualys SSL Labs to get all the TLS information about the server to solve this.You must be logged in to submit your flag.
Decrypting TLS 1.230 pts · 1260 Solves · 3 SolutionsLet's rewind for a moment and talk about TLS 1.2, and why it has been superseded by TLS 1.3.
Attached is a packet capture "tls2.cryptohack.org.pcapng" of a TLS 1.2 connection being made totls2.cryptohack.orgusing thecurlcommand-line tool. Unlike the TLS 1.3 connection we were looking at in the previous packet capture, more of the handshake is visible in plaintext.
Plaintext Certificate
In packet 12 sent from the server to our laptop, we can see the full TLS Certificate. In TLS 1.3, the certificate is encrypted. Network security devices that run on corporate networks often relied on passively monitoring certificates to work out which connections to block; they can no longer use this method for TLS 1.3 connections.
Network security devices now use other methods to snoop on TLS 1.3 connections, we'll cover that in a later challenge.
Client Key Exchange
In packet 14 sent from laptop to server, there is a Client Key Exchange. Either RSA, various types of DHKE (Diffie-Hellmann Key Exchange), or PSK (Pre-Shared Key) algorithms can be used for key exchange. If RSA is used, then the client generates a random value called the premaster secret, encrypts it using the public key from the certificate sent by the server, and sends this to the server. Both laptop and server now have the means to calculate the master secret and therefore the shared session key, by combining the premaster secret with random values. If Diffie-Hellman is used as the key exchange algorithm, the client and server send each other their Diffie-Hellmann public values, allowing the same premaster secret to be calculated by both sides.
TLS 1.3 completely removed the Client Key Exchange step. It is no longer needed thanks to the more limited set of supported algorithms. Only Ephemeral Diffie Hellman key exchanges are supported (plus the much less commonly used PSK). The client now guesses which cipher suite the server will accept, and sends the Diffie-Hellman parameters in the Client Hello. Ultimately this saves a full network roundtrip when establishing a connection, making TLS 1.3 noticeably faster when browsing the Internet.
Decrypting non-ephemeral TLS 1.2
A major weakness of pre-TLS 1.3 cipher suites is that many cipher suites used long-term RSA (or less commonly static DH) keys for key exchange. As we just noted, the client sends the premaster secret encrypted by the RSA public key in the server certificate. We'll discuss how this relates to forward secrecy further in the next challenge. For now, you'll use the fact to decrypt a TLS 1.2 stream.
In the attached PCAP file for this challenge, the connection was made using theTLS_RSA_WITH_AES_256_GCM_SHA384cipher suite (AES256-GCM-SHA384in OpenSSL format). This uses RSA for key exchange.
You've hacked thetls2.cryptohack.orgserver and obtained the certificate's RSA private key. Use it to decrypt the TLS connection and find the flag in the HTTP/2 stream.
In Wireshark's "TLS Decrypt" dialogue, you don't need to worry about the IP address, port or other fields except "Key File". Select the file and Wireshark will figure out the rest.
Challenge files:
- tls2.cryptohack.org.pcapng
- privkey.pem
Resources:
- Wireshark: TLS Decryption
You must be logged in to submit your flag.
Decrypting TLS 1.335 pts · 1195 Solves · 3 SolutionsTo recap, the TLS handshake can be split up into four main stages. Despite changes in TLS 1.3, these high-level stages remain:- Client and server exchange capabilities, and agree upon connection parameters.
- Certificate(s) presented are verified, or authentication occurs using other means.
- A shared master secret is agreed upon that will be used to derive encryption keys for the connection.
- Both sides verify that no handshake messages have been tampered with.
As we just saw, in the old days of RSA key exchanges, having your RSA private key compromised was really quite bad. If an attacker could observe TLS network traffic, and either access the RSA key or crack the RSA parameters directly from the certificate, they could compromise not just present and future network traffic, but also past traffic. There were suspicions that intelligence agencies were doing just that - recording all traffic that they could in order to break it one day. Therefore a drive began to make forward secrecy a requirement of modern TLS.
In a TLS connection using Ephemeral Diffie-Hellmann key exchange, when a client connects, the server generates an ephemeral key pair. This ephemeral key pair is used in the key exchange with the client to generate a session key for the connection. The server's certificate key pair (usually RSA, for performance reasons) is now used only to authenticate the TLS handshake. After the connection ends, the server should delete its ephemeral key pair, although in practice it may remain in server memory for awhile.
To decrypt TLS 1.3 connections we need the parameters that were used to generate the shared master secret. Attached is a keylogfile.txt which contains these Diffie-Hellman parameters, recorded by a client connecting to "tls3.cryptohack.org". Once again, decrypt this traffic to find the flag in the HTTP/2 stream.
Challenge files:
- tls3.cryptohack.org.pcapng
- keylogfile.txt
Resources:
- Wireshark: TLS Decryption
- NSS Key Log Format
- Industry Concerns about TLS 1.3
You must be logged in to submit your flag.
Authenticated Handshake40 pts · 682 Solves · 4 SolutionsAuthentication occurs in the TLS handshake in three messages:- Certificate. Contains the identity of the server, with signatures on the certificate chaining up to a certificate authority trusted by the client. In mutual TLS, the client also sends a certificate of its own identity for the server to verify. We'll talk about certificates more in TLS Part 2.
- CertificateVerify. The server makes a signature over the entire handshake so far using the private key corresponding to the public key in the Certificate message. This proves that the server owns the private key corresponding to that Certificate. Yet another weakness of TLS 1.2 is that not all parts of the handshake were included in this message, which was fixed in TLS 1.3.
- Finished. At the end of the TLS handshake, both client and server authenticate the messages sent so far in the Finished message. This authenticates the whole handshake, and is important because any of the TLS messages could have been tampered with on the network, potentially in an attempt to downgrade the connection to use weaker cipher suites.
In the PCAP dumps, you can see that both client and server send the Finished messages just before switching over to sending encrypted HTTP. The TLS 1.3 spec says that this verification data is calculated as follows:verify_data = HMAC(finished_key, Transcript-Hash(Handshake Context, Certificate*, CertificateVerify*))- The
HMACfunction uses the last algorithm specified in the agreed cipher suite, usually SHA256 or SHA384. - The
finished_keyis the relevant handshake_traffic_secret, theCLIENT_HANDSHAKE_TRAFFIC_SECRETseen in the keylogfile.txt in the case for the client's Finished. - The
Transcript-Hashfunction works by concatenating together TLS messages (not including record layer headers) and hashing the result using the hash algorithm in the cipher suite.
In this challenge, we've included a PCAP dump of a connection, up until the point that the client sends its ChangeCipherSpec and Finished messages. Fill in the blanks in the "client_finished.py" script to calculate what theverify_datain the Client Finished message should look like, and submit that as your answer.
Challenge files:
- client_finished.py
- keylogfile.txt
- no-finished-tls3.cryptohack.org.pcapng
Resources:
- RFC 8446 - The Transport Layer Security (TLS) Protocol Version 1.3
- The Illustrated TLS 1.3 connection
- NSS Key Log Format
You must be logged in to submit your flag.
Cloud
Toggle-
Megalomaniac 1100 pts · 363 Solves · 2 SolutionsIn June 2022, a team of researchers from the Applied Crypto Group at ETH Zurich discovered a few flaws in the E2E cryptographic architecture of MEGA. This series of challenges will put you in the shoes of a Mega cloud storage server, interacting with clients logging into their personal storage. Please note that while the implementation is really close to the real one, it is not exactly the same, as the point is to illustrate the different concepts used to compromise users' private data while keeping the codebase relatively small.
First, recover the user's ShareKey!
Connect atsocket.cryptohack.org 13408
Challenge files:
- 13408.py
Resources:
- Malleable Encryption Goes Awry
Challenge contributed by $inYou must be logged in to submit your flag.
Megalomaniac 2120 pts · 250 Solves · 6 SolutionsIn a realistic scenario, an evil server would want to be able to recover it with a minimal number of queries, good luck ;)
Connect atsocket.cryptohack.org 13409
Challenge files:
- 13409.py
Challenge contributed by $inYou must be logged in to submit your flag.
Megalomaniac 3120 pts · 274 Solves · 3 SolutionsLevel Up

You are now level Current level